Check out these Trendy Maternity Clothes !
 When I had my first daughter, Lily, I wore the ugliest, baggiest, frostiest maternity pants and I wore them happily because they were all I knew. I still have them....upstairs....on the hanger....never to be seen again. Next stop, consignment sale.
When I had my second daughter, Molly, I wore a few more reasonable if not slightly baggy-in-the-butt jeans but they were VERY tight around the waist, especially in the third trimester. I'm not quite sure why, I'm really not that big.
Now that I'm 20 weeks pregnant with....(insert forthcoming name here) I've come to the awful realization that comfortable, good fitting maternity pants are for the affluent and prosperous- those who can afford to spend $75 or so on a new pair. Let's just say I'm about.....$70 or so dollars shy of that number.
I said to myself NO! Not another unflattering nine months of pregnancy. If I have to be hunched over a toilet while massaging my aching temples at least I can look smart and snappy while doing it.
So I drove to my old stoppin' grounds, also referred to as the local Salvation Army and bought a couple jeans to take home and perform sewing surgery.
A few tips, if you are also in my tightly fitting shoes, go to the Salvation Army on Wednesdays, everything except the inventory that came in the night before is half off! Go every week and eventually you'll find things you like. Get a Goodwill Shop'n'Save card. It costs less than $5, lasts for a year, and will probably pay for itself on your first purchase. Goodwill gets inventory that Target doesn't sell so you can get a lot of brand new, never worn clothing for a VERY good price. Also, not all Goodwills have the same prices. Some are A LOT cheaper than others. So if one store is charging $7 for a Liz Lange maternity top, try another Goodwill in the area. It should only cost $1-$3.
This was the result. The first and last pair I actually bought at Forever 21 for $7.99 and $12.99. They are 'skinny' jeans and before you say "NO WAY, skinny jeans and pregnancy DO NOT mix". I say, "Wait, give them a try". What do you have to lose? $8? Three sizes of extra material in your tush?

I've bought ALL of my maternity wardrobe at thrift stores this time around and I'm proud to say I haven't patroned Motherhood Maternity once. I haven't paid over $7 for a stitch and the majority of pieces I've bought were only $1-$3.
The best part about these pants are that they are COMFORTABLE since no elastic is involved. And now that I have a little bit of baby bump they stay on with no problem. And of course, they aren't saggy in my butt. As an already short person I don't need anything de-emphasizing my legs.
And in my opinion, they are quite easy. I know, I know, if you're just a beginner they AREN'T that easy. In all honesty, on a scale of 1 to 10, I would say this project has a difficulty level of 4.
When you're finished you'll have a great fitting, easy-on-the-wallet, easy-on-the-waist, pair of maternity pants that you can brag to your friends about.
In all I'd say this project takes me about 20 minutes.
 Materials:
Pants
Knit Fabric (that closely matches pants) 8"x45" or 12"x45"
Felt tipped marker
Scissors
Straight Pins
Sewing Machine
Step 1. Find a pair of pants that you won't feel bad about ruining. I bought these at a Salvation Army for $2. Try them on and be sure they can be pulled up around your waist but NOT buttoned. This is important. At the end of my last pregnancy, to my horrid surprise, I couldn't even pull any of my jeans up to my waist let alone button them....and that was AFTER I had the baby.
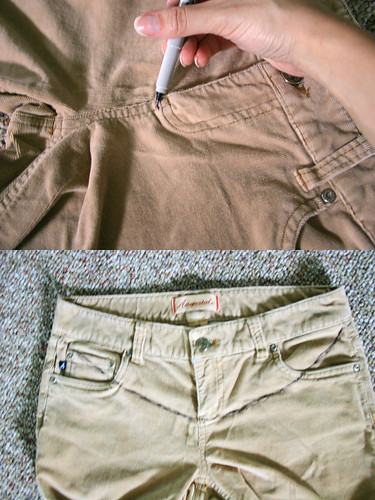 Step 2. With a felt tipped marker or disappearing ink marker draw your cutting line around the waist. Start just below the zipper and curve up to the bottom of the belt loops at each side of the waist. See right pic for example. In the back continue your line just below the belt loops.
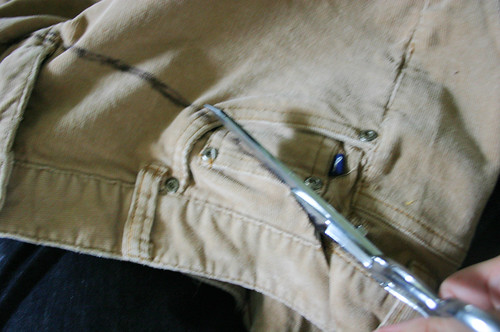 Step 3. Cut along the line. Don't worry about the pockets just cut right through everything. If it makes it easier for you, try placing a few straight pins in the pockets to keep them from coming apart later.
Also, try to cut off any metal that could get into the way of the sewing machine. For instance, in the photo to the left I cut the metal divots out. If the cut goes below the line it's really no big deal.
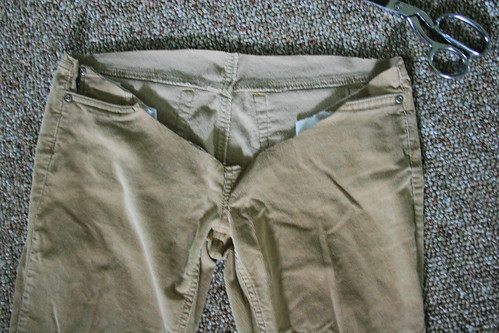
Step 4. This is how your finished cut should look.
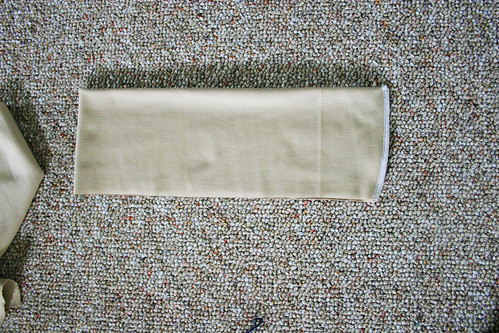
 Step 5. Take your knit fabric. Cut a 8"x45" piece and fold it in half. OKAY, HERE'S SOMETHING REALLY IMPORTANT. Remember to cut the fabric so that the stretch of the knit is width (left to right) and NOT length (up to down). Otherwise you won't have any stretch in your band, thus defeating the purpose of maternity pants, right?!
Here's another good tip, the earlier you are in your pregnancy the skinnier the waist band should be.
0-4 months= 8"
5-and up= 12"
 Step 6. Take the folded band and stretch it around your belly. If you are further along you don't have to pull as hard to stretch the fabric. But still make it stretch a little. If you are less than four months along pull the fabric as tight as you can. Then cut the fabric leaving about 5/8" for seams.
I held my fabric a little too high in this picture which caused the band to be too tight later. It should be held just under your belly, the way it will fall when you are wearing them.
 Step 7. Sew the two ends together. This is how it should look when you are done.
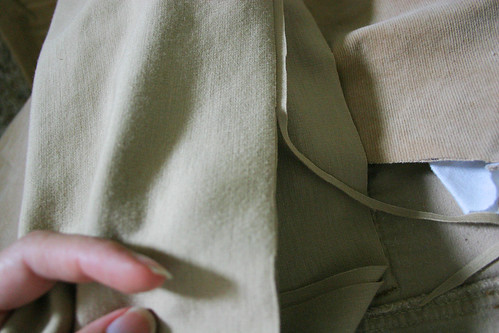 Step 8. Cut off any extra fabric that doesn't line up at the bottom. The bottom of your band needs to be exactly lined up. Otherwise when you sew the band to your pants you could sew one side and miss the other.
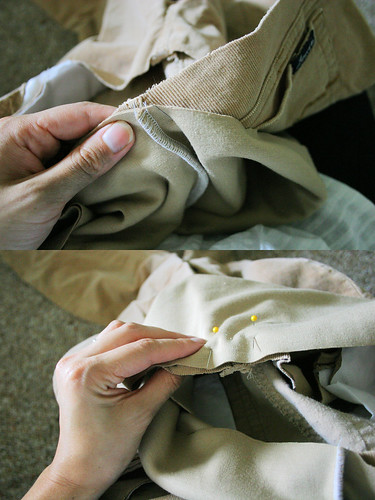
Step 9. Pin the band to your pants. This is probably the hardest part of the project because the band will be smaller than the opening of your pants. You'll have to stretch the band a bit.
Here's a good way to start. Slip the band over the pants so it is on the outside and the bunched up pants are on the inside. Keep the right sides together when doing this and match the cut side of the band to the cut pant. Pin the seam of the band to the back of the pants. Then find the opposite side of the band and pin that to the front of the pants. Then takes the sides and pin them so that you now have four pins in four sides and stretch the band in between the pins to fit the opening of the pants.
Remember that when you pin the band to the pants that you pin the right sides together.
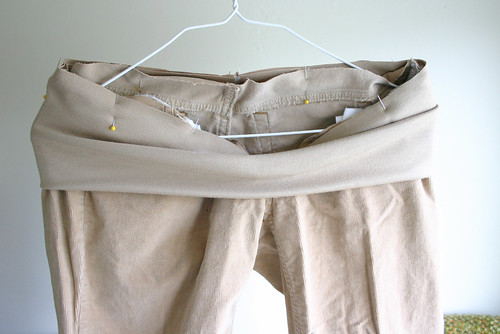 Step 10. This is how the pinned band should look.
 Step 11. Sew the band to the pants. The finished seam should look like this. Remove the pins.

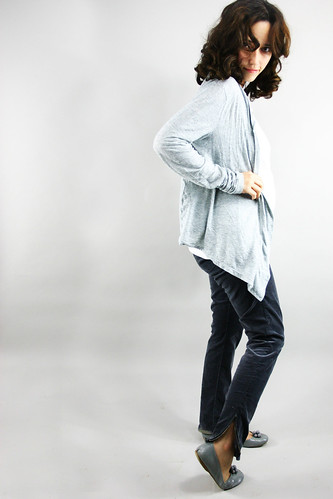
Step 12. Voila! Pull the band up and there is the finished pant. Surprise, it's the one pictured in the second photo at the top of the page. Good enough to slip on right now! Comfy as sweat pants:) Enjoy!
Create a Linkj
j.crew, j crew, jcrew, j.crew, j crew, jcrew, j.crew, j crew, jcrew, j.crew, j crew, jcrew, ann taylor, ann taylor loft, modcloth, express, gymboree, the children's place, gap, baby gap, old navy, the limited, crewcuts, garnet hill
When I had my first daughter, Lily, I wore the ugliest, baggiest, frostiest maternity pants and I wore them happily because they were all I knew. I still have them....upstairs....on the hanger....never to be seen again. Next stop, consignment sale.When I had my second daughter, Molly, I wore a few more reasonable if not slightly baggy-in-the-butt jeans but they were VERY tight around the waist, especially in the third trimester. I'm not quite sure why, I'm really not that big.
Now that I'm 20 weeks pregnant with....(insert forthcoming name here) I've come to the awful realization that comfortable, good fitting maternity pants are for the affluent and prosperous- those who can afford to spend $75 or so on a new pair. Let's just say I'm about.....$70 or so dollars shy of that number.
I said to myself NO! Not another unflattering nine months of pregnancy. If I have to be hunched over a toilet while massaging my aching temples at least I can look smart and snappy while doing it.
So I drove to my old stoppin' grounds, also referred to as the local Salvation Army and bought a couple jeans to take home and perform sewing surgery.
A few tips, if you are also in my tightly fitting shoes, go to the Salvation Army on Wednesdays, everything except the inventory that came in the night before is half off! Go every week and eventually you'll find things you like. Get a Goodwill Shop'n'Save card. It costs less than $5, lasts for a year, and will probably pay for itself on your first purchase. Goodwill gets inventory that Target doesn't sell so you can get a lot of brand new, never worn clothing for a VERY good price. Also, not all Goodwills have the same prices. Some are A LOT cheaper than others. So if one store is charging $7 for a Liz Lange maternity top, try another Goodwill in the area. It should only cost $1-$3.
This was the result. The first and last pair I actually bought at Forever 21 for $7.99 and $12.99. They are 'skinny' jeans and before you say "NO WAY, skinny jeans and pregnancy DO NOT mix". I say, "Wait, give them a try". What do you have to lose? $8? Three sizes of extra material in your tush?

I've bought ALL of my maternity wardrobe at thrift stores this time around and I'm proud to say I haven't patroned Motherhood Maternity once. I haven't paid over $7 for a stitch and the majority of pieces I've bought were only $1-$3.
The best part about these pants are that they are COMFORTABLE since no elastic is involved. And now that I have a little bit of baby bump they stay on with no problem. And of course, they aren't saggy in my butt. As an already short person I don't need anything de-emphasizing my legs.
And in my opinion, they are quite easy. I know, I know, if you're just a beginner they AREN'T that easy. In all honesty, on a scale of 1 to 10, I would say this project has a difficulty level of 4.
When you're finished you'll have a great fitting, easy-on-the-wallet, easy-on-the-waist, pair of maternity pants that you can brag to your friends about.
In all I'd say this project takes me about 20 minutes.
Materials:Pants
Knit Fabric (that closely matches pants) 8"x45" or 12"x45"
Felt tipped marker
Scissors
Straight Pins
Sewing Machine
Step 1. Find a pair of pants that you won't feel bad about ruining. I bought these at a Salvation Army for $2. Try them on and be sure they can be pulled up around your waist but NOT buttoned. This is important. At the end of my last pregnancy, to my horrid surprise, I couldn't even pull any of my jeans up to my waist let alone button them....and that was AFTER I had the baby.
Step 2. With a felt tipped marker or disappearing ink marker draw your cutting line around the waist. Start just below the zipper and curve up to the bottom of the belt loops at each side of the waist. See right pic for example. In the back continue your line just below the belt loops.Step 3. Cut along the line. Don't worry about the pockets just cut right through everything. If it makes it easier for you, try placing a few straight pins in the pockets to keep them from coming apart later.Also, try to cut off any metal that could get into the way of the sewing machine. For instance, in the photo to the left I cut the metal divots out. If the cut goes below the line it's really no big deal.
Step 4. This is how your finished cut should look.
Step 5. Take your knit fabric. Cut a 8"x45" piece and fold it in half. OKAY, HERE'S SOMETHING REALLY IMPORTANT. Remember to cut the fabric so that the stretch of the knit is width (left to right) and NOT length (up to down). Otherwise you won't have any stretch in your band, thus defeating the purpose of maternity pants, right?!Here's another good tip, the earlier you are in your pregnancy the skinnier the waist band should be.
0-4 months= 8"
5-and up= 12"
Step 6. Take the folded band and stretch it around your belly. If you are further along you don't have to pull as hard to stretch the fabric. But still make it stretch a little. If you are less than four months along pull the fabric as tight as you can. Then cut the fabric leaving about 5/8" for seams.I held my fabric a little too high in this picture which caused the band to be too tight later. It should be held just under your belly, the way it will fall when you are wearing them.
Step 7. Sew the two ends together. This is how it should look when you are done.Step 8. Cut off any extra fabric that doesn't line up at the bottom. The bottom of your band needs to be exactly lined up. Otherwise when you sew the band to your pants you could sew one side and miss the other.Step 9. Pin the band to your pants. This is probably the hardest part of the project because the band will be smaller than the opening of your pants. You'll have to stretch the band a bit.
Here's a good way to start. Slip the band over the pants so it is on the outside and the bunched up pants are on the inside. Keep the right sides together when doing this and match the cut side of the band to the cut pant. Pin the seam of the band to the back of the pants. Then find the opposite side of the band and pin that to the front of the pants. Then takes the sides and pin them so that you now have four pins in four sides and stretch the band in between the pins to fit the opening of the pants.
Remember that when you pin the band to the pants that you pin the right sides together.
Step 10. This is how the pinned band should look.Step 11. Sew the band to the pants. The finished seam should look like this. Remove the pins.Step 12. Voila! Pull the band up and there is the finished pant. Surprise, it's the one pictured in the second photo at the top of the page. Good enough to slip on right now! Comfy as sweat pants:) Enjoy!
Create a Linkj
j.crew, j crew, jcrew, j.crew, j crew, jcrew, j.crew, j crew, jcrew, j.crew, j crew, jcrew, ann taylor, ann taylor loft, modcloth, express, gymboree, the children's place, gap, baby gap, old navy, the limited, crewcuts, garnet hill
Post Title
→Maternity Pants Tutorial
Post URL
→http://bizzybbakes.blogspot.com/2009/09/check-out-these-trendy-maternity.html
Visit bizzybbakes for Daily Updated Wedding Dresses Collection


