 Are you like me? Do you have a box full of old tee shirts. Some are too sentimental to throw away. Others are just too big, too stained or too tight. Don't fret. There are so many things you can do to recycle a used tee shirt. I think you'd be surprised how many wonderful things! I like to call this little hobby- "Teecycling". So I've decided to dedicate a post every week (well in theory) to our old friend, the tee shirt.
First 'Teecycle'- a child's tee-shirt dress tutorial. Do you have the same problem as me? Chocolate milk stains on EVERYTHING! Those bastards do NOT come out. The military should look into the power of the chocolate milk stain. It could change the world I tell you. I TELL YOU!
This idea works well for soiled shirts. If the stain is near the middle or bottom of the shirt you can simply cut it off. The cute shirt pictured to the left was from Gymboree. I liked the embroidered strawberries and didn't want to throw it away just because it happened to have a chocolate milk stain.
Since this was such an easy, simple piece. The only thing you have to do to be entered in this giveaway is to leave a comment in this post.

Step 1. Find an old tee shirt. Preferably one that has a defect under the line at which you are going to add the skirt.
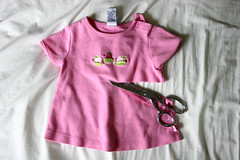
Step 2. Cut the tee shirt. I chose to do a dress with an empire waist. BUT, you could also do a traditional waist. If that's what you prefer just make the cut a little lower, at the waistline. Another idea, don't cut the shirt at all. Just add a skirt at the bottom of the shirt for a flapper look. I've seen a couple Carter dresses like this and works well with polo shirts.
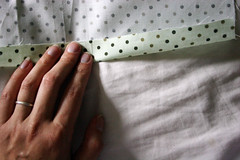
Step 3. Choose a fabric for your skirt. I choose a piece of fabric I found in my scrap drawer. You want a piece that's about twice the circumference of the waist you just cut. The length will depend on whether you decided to make an empire, traditional or flapper skirt. Measure from the bottom of the cut shirt to your child's knees then add an inch for allowances. Take those two measurements and cut your fabric. Then fold and sew a 3/4t hem at the bottom.
 Step 4. Gather the top. In case you don't know how to gather, I'll give you a quick mini tutorial. Set your machine to the longest setting and loosest stitch. Then sew from one end to the other. DO NOT BACKSTITCH! Knot one end. Take the other end and separate the two pieces of thread. Hold the top thread and push the fabric across, creating a gather. Be careful not to snap the thread. Gather the fabric to the correct length. You can figure out the length by lining it up to the circumference of your tee-shirt's waist, adding about 3/4" for allowance.
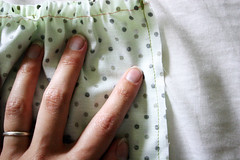
Step 5. Once you have the fabric gathered to the correct length sew the two sides of your skirt fabric together (right sides facing) so that you have a "tube".

Step 6. With right sides together sew the gathered tube to the cut tee shirt. To do this, turn the tee shirt upside down and place it inside the skirt. BE SURE THAT THE RIGHT SIDES ARE TOGETHER!

Step 7. Turn right side out and you're DONE! Since I used a scrap piece of fabric I couldn't make the length long enough and altered the first photo to appear longer. So I would say that this little dress would fit a 12-18 month old.
Since this was such an easy, simple piece. The only thing you have to do to be entered in this giveaway is to leave a comment in this post.
Post Title
→"Teecycle" Dress Tutorial and GIVEAWAY!!!! CLOSED.
Post URL
→http://bizzybbakes.blogspot.com/2009/08/are-you-like-me-do-you-have-box-full-of.html
Visit bizzybbakes for Daily Updated Wedding Dresses Collection


