Showing posts with label photoshoots. Show all posts

Photo Shoot Concepts 23: SD Card Tips

    I recently mentioned that my sister, Chantalene, was married at the beginning of this month. They were really on a budget so she asked me to take her photos for her.

    I was nervous and rightfully so! There was a lot I learned about wedding photography in the process. It's just not the same as portrait, at all! There are a lot of things I wish I could do over. And there are a few things I realize I would need if I ever shot a wedding again (which I have no intentions of;). A fast SD card for one. A lot of my images were shot in RAW taking up quite a bit of data so I missed a lot of moments because the darn thing wouldn't process fast enough. 

    Here's a great page about choosing a memory card for your camera. With all the options and prices out there for SD cards, I definitely recommend it.

Post Title

→

Photo Shoot Concepts 23: SD Card Tips


Post URL

→

https://bizzybbakes.blogspot.com/2011/09/i-recently-mentioned-that-my-sister.html


Visit bizzybbakes for Daily Updated Wedding Dresses Collection

Photo Shoot Concepts 22: Photoshop Actions Learn It!

Post Title

→

Photo Shoot Concepts 22: Photoshop Actions Learn It!


Post URL

→

https://bizzybbakes.blogspot.com/2011/08/ever-wondered-about-photoshop-actions.html


Visit bizzybbakes for Daily Updated Wedding Dresses Collection

Tamron AF 18-270mm Zoom Lens Review

    For a long time I've been using the lens that came with my Canon DSLR along with a fixed 50mm f/1.8 and a 75-200mm telephoto lens. And that combination is great but it does require a lot of changing, not only of lenses but settings after you've changed lenses since the f/stops are different. It's okay but it is a lot of work.

    I really wanted something that could do a lot of the same things in one lens. Enter the Tamron 18-270mm lens. It has the best of both worlds in terms of zoom beginning at 18mm (closer than my standard lens) and ending at 270mm (further than my telephoto lens). I can get very close (ie the top photo of a yucky cupcake the girls made was taken at only 2 feet above.)

    And then here are some really fantastic examples of how extreme the 15x zoom lens is.
    In comparison to my fixed 50mm f/1.8, the Tamron lens has an f/stop of 3.5 however with a zoom of such a wide range I can still achieve the blurred background effect of my f/1.8. If you're new to photography one of the great bonuses to having an f/stop around 2 is that you can get good perspective. That is, you subject is in focus and your background is not. The lower the f/stop the less distance you need between your subject and the background to achieve blurring. BUT, you can ALSO get that effect if you have a camera with a long zoom.
    Just stand far enough away from your subject that you will be extending your zoom very far and you will get the same great background (or foreground) blur. I took this pic of Molly at around 15 feet away. I took the lower pic at about 5 feet away of Eloise who had been playing in the dirt and managed to get all the messy details on her face.

    So really, this lens IS the best of all my lenses.
     
    For an example of a night shot, I took this picture in VERY dark lighting (twilight), holding the lens in my hands, while keeping the camera as still as I could. One very important feature which helped to reduce blur at this low shutter speed was the Vibrator Compensation mode. With the VC (Vibrator Compensation) you can do handheld shots at as many as four shutter speeds slower than would otherwise be possible.
     
    Another benefit from the VC (Vibrator Compensation) is when you are shooting from far away. When you have a heavy lens with a long zoom your photos would very often suffer from the movement in your hands especially when focusing on a subject a couple dozen feet away. But with VC you have far more image stabilization for sharper images. I took this pic of Molly jumping out of the baby pool at 35 feet away. Pretty impressive.
    This lens retails for $650 compared to other similar brand name lenses which cost $2000+ it's a great deal! And the Tamron lens fits on both Canon and Nikon cameras.

    I think that calls for a celebration! PS. Molly's birthday was yesterday;) Happy fourth!

    So in my opinion this lens gets a thumbs up! Great in price, great in versatility and great in picture quality. Can't wait to show you all the more great photos I'll be taking with it:)


Post Title

→

Tamron AF 18-270mm Zoom Lens Review


Post URL

→

https://bizzybbakes.blogspot.com/2011/06/for-long-time-ive-been-using-lens-that.html


Visit bizzybbakes for Daily Updated Wedding Dresses Collection

The Dreamy Diana Lens for Your DSLR


    For those of you who like the look of the dreamy blurred diana lens but not the cost of film or processing time you might want to give the Diana Lens + Adapter a try!

    It's a lovely plastic lens that transforms your beloved hunk of metal and glass into a digital toy camera. You can now get that lovable Lo-fi "technology" on your digi cam from Lomography's series of Diana plastic cameras. Dianas are known for their low saturation, soft surreal blurs, and unpredictable colors.

    Simply attach the plastic lens and its adapter directly onto your SLR's body (Nikon or Canon) and shoot away. With one part Diana camera (old school lo-fi plastic) and one part modern DSLR you've got yourself one mighty fine recipe for unconventionally amazing photographs.

    Now, I tried to be as hands off as I could in terms of digitally processing any of these images. I wanted you to see what these looked like straight out of the camera just the same way film would be. I did NOTHING with saturation or blurring or vingetting in Photoshop. That is all settings out of the camera.

    There is a technique to using this lens. If you like the same leeky light, plasticky, vingettey photos that you get with a film diana you need to do a couple things which then produce great results.
    First I created a splitzer. You can buy splitzers for this lens which block out some of the frame of the lens so that you get that cool vingetting effect. But I didn't have one on hand so I just made one of my own. It wasn't hard. I just took a used cardboard box and cut a hole just a little smaller than my lens. To figure out how small the hole needed to be I just used trial and error. I did make a slightly irregular hole since the photos are rectangle instead of square but you could take this as an opportunity to make a square so that your pictures are a square shape instead of rectangle. You'd just have to go back and crop out the extra black space on the edges when you put them on your computer.

    Another great add-on would be the fisheye option. You can buy any add-on lens as long as you also buy the correct adapter to fit your camera.
    You could also add colored cellophane to make the photo warmer or colder.
    A few interesting notes. The first time I put this lens on it felt very loose and I read a lot of other people had the same issue. However, when I looked into it further it's just a matter of really clicking the lens in place. It's not terribly obvious but once it's on properly you shouldn't have any problem with the lens being loose.

    Also, when you use this lens, obviously you don't have any control over f/stop. But you do have free range over ISO and shutter speed. So getting just the right light is not a big deal which actually is a plus in comparison to the original plastic film cameras. I will also say that the type of blur is slightly different from the plastic film camera version but as long as your ISO isn't too high it doesn't look grainy.


Post Title

→

The Dreamy Diana Lens for Your DSLR


Post URL

→

https://bizzybbakes.blogspot.com/2011/06/for-those-of-you-who-like-look-of.html


Visit bizzybbakes for Daily Updated Wedding Dresses Collection

Professor Kobre's Light Scoop Review

    Yesterday I introduced you to Katie Perkes and her incredible ebook The Key to Taking Pictures Like a Professional Photographer. So now, that you know all the ins and outs of your camera I wanted to introduce some really neat adds ons that will help you to take pictures like a pro!

    Remember yesterday I mentioned how a lot of people use their built in flash indoors and how you don't need to do that? Well, I wasn't lying BUT there are some drawbacks to using no flash in low light. Now, don't get me wrong, I've seen people use their flash in perfectly fine lighting but I realize that there are some situations where not using a flash results in a very orangey, yellow picture. Now, I'd rather have that than a blown out over exposed face taken with a flash and try to clean the yellow out in Photoshop but that's just my preference. Some other people might like the crisper details of the scene. But I have a really GREAT secret. You can have both, a great crisp picture, no yellow and without the cost of an expensive speedlite.

    I know a lot of you have heard of speedlites but can't afford to buy one. I got mine as a Valentine's Day gift but I know it costs close to $300 for a new brand name version. If the only reason you need a speedlite is to take indoor photos and avoid that head-on glare then take a look at the Light Scoop!
     
    Now, let me preface this by saying that a speedlite will do about a million more things that a Light Scoop can't like adjust multiple angles of flash, take external flashes and adjust the brightness of your flash but honestly, a lot of those settings aren't necessary until you are a seasoned photographer in which case an expensive speedlite would be an appropriate purchase. For those of you who just want nice indoor shots, the Light Scoop is INVALUABLE! No lie. And at only $30, it's a heck of a lot less expensive than a speedlite.
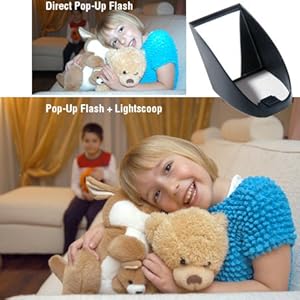
    Take a look at these two photos. Both were taken straight from my camera no digital clean up. The one on at top was taken with the built-in flash directed in front of the subject (Eloise), while the one below was taken with a Light Scoop. These were taken with a lot of natural light in the room but I have to tell you that you get the best before and after results when you use the Light Scoop indoors with artificial light. See here. See here. And here.
    This is how it works....the Light Scoop attaches to your camera's hot shoe like any other external flash. Then when the picture is taken, the built-in flash is triggered and bounces off the mirror in the Light Scoop directing it up and away from your subject for a much more diffused, true-to-life lighting. I'm actually wondering why no one ever thought of this earlier. I'm ACTUALLY wondering why cameras aren't made with an adjustable flash standard but that's another story I guess.

    Here's a video on how the Light Scoop works:
    I bought mine at Photojojo. But I bet you're wondering "Will it work with my camera?" The Light Scoop will work with:
    Canon 10D, 20D, 30D, 40D, 50D, Rebel XTi, XSi, 400, 450, XT, XS, 350, 1000D
    Fuji FinePix Pro
    Nikon D40, D40x, D50, D60, D70, D70s, D80, D90, D100, D200, D300, D700
    Olympus E420, E520, E3, E620
    Pentax K10D, K100D, K20D, K200D
    Sigma SD14

    Sony cameras require a Sony Lightscoop, not a Universal model.
    Sony a100, a200, a250, a300, a350, a330, a380, a500, a550, a700
    It will not work with point and shoot cameras. Their flashes are not strong enough to bounce light onto the ceiling:(

    Here's some more before and after shots I took with my camera. The one on the right was taken without the flash. The one on the left was taken with the flash pointed at the subject (Molly) and the one in the middle was taken with the Light Scoop.
    One more thing, even though I OWN a speedlite I've found the light scoop to be far more practical. It doesn't require batteries and is light as a feather. I found that I was often leaving my speedlite at home because either I had forgot to charge the lithium batteries or it was just too bulky to tote around. Now, I leave the light scoop on my camera at all times and use it whenever the situation arises. Very convenient!
     

Post Title

→

Professor Kobre's Light Scoop Review


Post URL

→

https://bizzybbakes.blogspot.com/2011/06/yesterday-i-introduced-you-to-katie.html


Visit bizzybbakes for Daily Updated Wedding Dresses Collection

The Key to Taking Pictures Like a Professional Photographer ebook Giveaway

    Ever since I started this blog I have really begun taking an interest in photography. I was into photography before but never invested the money in a good DSLR. In fact it wasn't until a couple years ago that DSLRs became affordable to me. But since that purchase I haven't looked back. I remember writing about the first few fast shutter shots I took and how impressed I was with the results.

    I am constantly impressed by the ability of people just like me who have had no formal training to produce professional quality photos. Even starting their own photography businesses on what began as a hobby. With today's photo imaging technology it's easier than ever to take quality shots.

    Which is why I'm so excited to share a great resource with you other budding photographers out there. A couple weeks ago I saw this e-book on Made. I emailed the author, photographer Katie Perkes, for a chance to review it and give a few away. And happily, she agreed to offer three copies to three Grosgrain readers.

    What caught my attention with this ebook was the info on getting good natural lighting. So often I see these great shots of kids whose faces seem lit up but you can tell the photo is not taken in full sun. Katie goes into detail about how to get those great shots and more.
    Did you ever see that saying "You are not a photographer. You just have an overpriced camera." I feel like that is true for a lot of people. So often I see parents at school events with their obviously very expensive Canon DSLRs that are using the flash pointed directly at their subjects while indoors with decent lighting. Or paying no attention to any of the manual settings and using only the options on the 'auto' side of the wheel. (Here's a tip, if you know your manual settings it is very rare that you have to use that ugly flash).

    Katie helps people with great cameras, take those great photos that they bought their great camera for in the first place! In her second chapter she discusses all the basics of SLRs. That being shutter, aperture, ISO. If you know the very basics of these three settings your photos will improve 100% percent. I promise. And it's not rocket science. Katie explains everything in very everyday terms. No professional words here. If you know zero about the manual settings of your DSLR by Chapter three you won't ever need to switch that dial to 'Auto' again.

    Those are the most important parts of photography but they are certainly not the only great pieces of advice Katie offers. She also goes into detail about how to create a great shoots and how to compose the subjects in your photos for a great look.

    And finally Katie goes into a chapter about something that I think should be a must for any photographer and that is a great photo editing software. Using a powerful photo editing software can sometimes take a really dull looking photo and turn it into the best of your shoot. 

    For those of you who've never even opened a photo editing program, Katie explains some very basic tools like contrast, vibrance and blacks and tells you how to use them to make your photos POP! But she also mentions some more in depth tips like converting to black and white the proper way, actions/presets, using brushes to highlight specific areas, fixing overexposure, using a really amazing tool called 'clarity' and many other highly useful tools.

    So don't be one of those people with a great camera who takes mediocre photos.  You really don't have to be scared of your manual settings! It's not like you're wasting film, right?! Katie's great ebook is a fabulous start to becoming a photographer and not just someone with an expensive camera.

    And for those of you who would like some one on one experience with Katie she is currently offering a great workshop for beginners! In it, learn:
    • the in's and outs of your camera so you can finally get it off auto.
    • all about aperture, ISO, and shutter speed and how they relate.
    • easy tips and tricks to get sharp crisp pictures.
    • what kind of light to look for, how to position your subject in regards to the light and how to take a good picture in any lighting situation.
    • how to compose a striking picture and what to look for in regards to composition through your lens.
    • her entire editing process from start to finish.

    Here's some of Katie's work from her website:


    If you'd like to purchase her ebook right now, Katie is offering Grosgrain readers a $2.00 of discount of her ebook! Use coupon code: grosgrain at checkout. 

    For your chance to win ONE OF THREE COPIES of Katie's ebook, Grosgrain giveaways can be entered by any ONE of four ways:
    1) By linking about this giveaway (to your blog, facebook, or any other site) button is below.
    2) By leaving a comment

    3) By FOLLOWING Grosgrain using this link. If the link is not working please use THE LINK IN MY RIGHT SIDEBAR.

    4) By following me on Twitter 
     

    Just remember to please leave me a comment telling me what you did so that I can go back and look for your entry. Either give me the link that you posted for the giveaway to or tell me that you began to follow me.
    Create a Link


Post Title

→

The Key to Taking Pictures Like a Professional Photographer ebook Giveaway


Post URL

→

https://bizzybbakes.blogspot.com/2011/06/ever-since-i-started-this-blog-i-have.html


Visit bizzybbakes for Daily Updated Wedding Dresses Collection

Photo Shoot Concepts 21: Elmo Scrunchie

Post Title

→

Photo Shoot Concepts 21: Elmo Scrunchie


Post URL

→

https://bizzybbakes.blogspot.com/2011/06/oh-my-goodness-this-would-be-great-when.html


Visit bizzybbakes for Daily Updated Wedding Dresses Collection

Photo Shoot Concepts 20: Photobooth Layouts

    This would be great as a focal point in a kids room especially a room that two kids shared. For a more 'photobooth' effect hang a red curtain and have the kids make funny faces. You could even do several strips that took up a whole wall.

Post Title

→

Photo Shoot Concepts 20: Photobooth Layouts


Post URL

→

https://bizzybbakes.blogspot.com/2011/06/this-would-be-great-as-focal-point-in.html


Visit bizzybbakes for Daily Updated Wedding Dresses Collection

Photo Shoot Concepts 19: Photographing Babies

Post Title

→

Photo Shoot Concepts 19: Photographing Babies


Post URL

→

https://bizzybbakes.blogspot.com/2011/06/inspire-me-baby-offers-some-great-tips.html


Visit bizzybbakes for Daily Updated Wedding Dresses Collection

Popular Posts

My Blog List

Blog Archive